
使用 Groovy™、OpenNLP、CoreNLP、Nlp4j、Datumbox、Smile、Spark NLP、DJL 和 TensorFlow 进行自然语言处理
发布时间:2022-08-07 07:34AM
自然语言处理无疑是一个庞大且有时复杂的话题,涉及许多方面。其中一些方面本身就值得写整篇博客。在这篇博客中,我们将简要介绍几个简单的用例,说明您如何在自己的项目中使用 NLP 技术。
语言检测
了解文本所代表的语言是后续处理的关键第一步。让我们看看如何使用预构建模型和 Apache OpenNLP 来预测语言。这里,ResourceHelper 是一个用于下载和缓存模型的工具类。首次运行可能需要一些时间来下载模型。后续运行应该会很快。这里我们使用的是 OpenNLP 文档中引用的一个知名模型。
def helper = new ResourceHelper('https://dlcdn.apache.org/opennlp/models/langdetect/1.8.3/')
def model = new LanguageDetectorModel(helper.load('langdetect-183'))
def detector = new LanguageDetectorME(model)

[ spa: 'Bienvenido a Madrid', fra: 'Bienvenue à Paris',
  dan: 'Velkommen til København', bul: 'Добре дошли в София'
].each { k, v ->
    assert detector.predictLanguage(v).lang == k
}
LanguageDetectorME 类允许我们预测语言。通常,预测器在小样本文本上可能不准确,但对于我们的示例来说已经足够了。我们已将语言代码作为映射中的键,并将其与预测语言进行比较。
一个更复杂的场景是训练您自己的模型。让我们看看如何使用 Datumbox 来做到这一点。Datumbox 有一个 预训练模型库,但其语言检测模型似乎不适用于下一个示例中的小片段,因此我们将训练自己的模型。首先,我们将定义我们的数据集
def datasets = [
    English: getClass().classLoader.getResource("training.language.en.txt").toURI(),
    French: getClass().classLoader.getResource("training.language.fr.txt").toURI(),
    German: getClass().classLoader.getResource("training.language.de.txt").toURI(),
    Spanish: getClass().classLoader.getResource("training.language.es.txt").toURI(),
    Indonesian: getClass().classLoader.getResource("training.language.id.txt").toURI()
]
de 训练数据集来自 Datumbox 示例。其他语言的训练数据集来自 Kaggle。
我们设置了算法所需的训练参数
def trainingParams = new TextClassifier.TrainingParameters(
    numericalScalerTrainingParameters: null,
    featureSelectorTrainingParametersList: [new ChisquareSelect.TrainingParameters()],
    textExtractorParameters: new NgramsExtractor.Parameters(),
    modelerTrainingParameters: new MultinomialNaiveBayes.TrainingParameters()
)
我们将使用带有卡方特征选择的朴素贝叶斯模型。
接下来,我们创建算法,用训练数据集对其进行训练,然后根据训练数据集进行验证。通常,我们会将数据分成训练和测试数据集,以提供更准确的模型准确性统计数据。但为了简单起见,同时仍然说明 API,我们将使用整个数据集进行训练和验证
def config = Configuration.configuration
def classifier = MLBuilder.create(trainingParams, config)
classifier.fit(datasets)
def metrics = classifier.validate(datasets)
println "Classifier Accuracy (using training data): $metrics.accuracy"
运行时,我们看到以下输出
Classifier Accuracy (using training data): 0.9975609756097561
我们的测试数据集将包含一些硬编码的示例短语。让我们使用模型来预测每个短语的语言
[   'Bienvenido a Madrid', 'Bienvenue à Paris', 'Welcome to London',
    'Willkommen in Berlin', 'Selamat Datang di Jakarta'
].each { txt ->
    def r = classifier.predict(txt)
    def predicted = r.YPredicted
    def probability = sprintf '%4.2f', r.YPredictedProbabilities.get(predicted)
    println "Classifying: '$txt',  Predicted: $predicted,  Probability: $probability"
}
运行时,它有此输出
Classifying: 'Bienvenido a Madrid',  Predicted: Spanish,  Probability: 0.83
Classifying: 'Bienvenue à Paris',  Predicted: French,  Probability: 0.71
Classifying: 'Welcome to London',  Predicted: English,  Probability: 1.00
Classifying: 'Willkommen in Berlin',  Predicted: German,  Probability: 0.84
Classifying: 'Selamat Datang di Jakarta',  Predicted: Indonesian,  Probability: 1.00
鉴于这些短语非常短,能够全部正确地得到它们是很不错的,并且在这种情况下,所有概率都看起来合理。
词性标注
词性 (POS) 分析器从它们在句子中扮演的角色方面检查句子的每个部分(单词和可能的标点符号)。一个典型的分析器将为单词分配或标注它们的角色,例如识别名词、动词、形容词等。这可能是亚马逊、苹果和谷歌的语音助手等工具的关键早期步骤。
在查看其他库之前,我们先看看一个可能不太知名的库 Nlp4j。实际上,有多个 Nlp4j 库。我们将使用 nlp4j.org 的那个,它似乎是最活跃且最近更新的。
该库在底层使用 Stanford CoreNLP 库来实现其英语 POS 功能。该库具有文档的概念,以及对文档进行操作的标注器。一旦标注完成,我们就可以打印出所有发现的单词及其标注
var doc = new DefaultDocument()
doc.putAttribute('text', 'I eat sushi with chopsticks.')
var ann = new StanfordPosAnnotator()
ann.setProperty('target', 'text')
ann.annotate(doc)
println doc.keywords.collect{  k -> "${k.facet - 'word.'}(${k.str})" }.join(' ')
运行时,我们看到以下输出
PRP(I) VBP(eat) NN(sushi) IN(with) NNS(chopsticks) .(.)
此示例的标注(也称为标签或分面)如下
PRP |
人称代词 |
VBP |
现在时动词 |
NN |
名词,单数 |
IN |
介词 |
NNS |
名词,复数 |
我们正在使用的库的文档提供了此类注释的更完整列表。
该库的一个优点是支持其他语言,特别是日语。代码非常相似,但使用了不同的注释器
doc = new DefaultDocument()
doc.putAttribute('text', '私は学校に行きました。')
ann = new KuromojiAnnotator()
ann.setProperty('target', 'text')
ann.annotate(doc)
println doc.keywords.collect{ k -> "${k.facet}(${k.str})" }.join(' ')
运行时,我们看到以下输出
名詞(私) 助詞(は) 名詞(学校) 助詞(に) 動詞(行き) 助動詞(まし) 助動詞(た) 記号(。)
在继续之前,我们将重点介绍 GroovyConsole 的结果可视化功能。此功能允许我们编写一个小的 Groovy 脚本,将结果转换为任何 Swing 组件。在我们的例子中,我们将带注释的字符串列表转换为包含 HTML 和彩色注释框的 JLabel 组件。详细信息不在此处,但可以在 仓库 中找到。我们需要将该文件复制到我们的 ~/.groovy 文件夹中,然后启用脚本可视化,如下所示
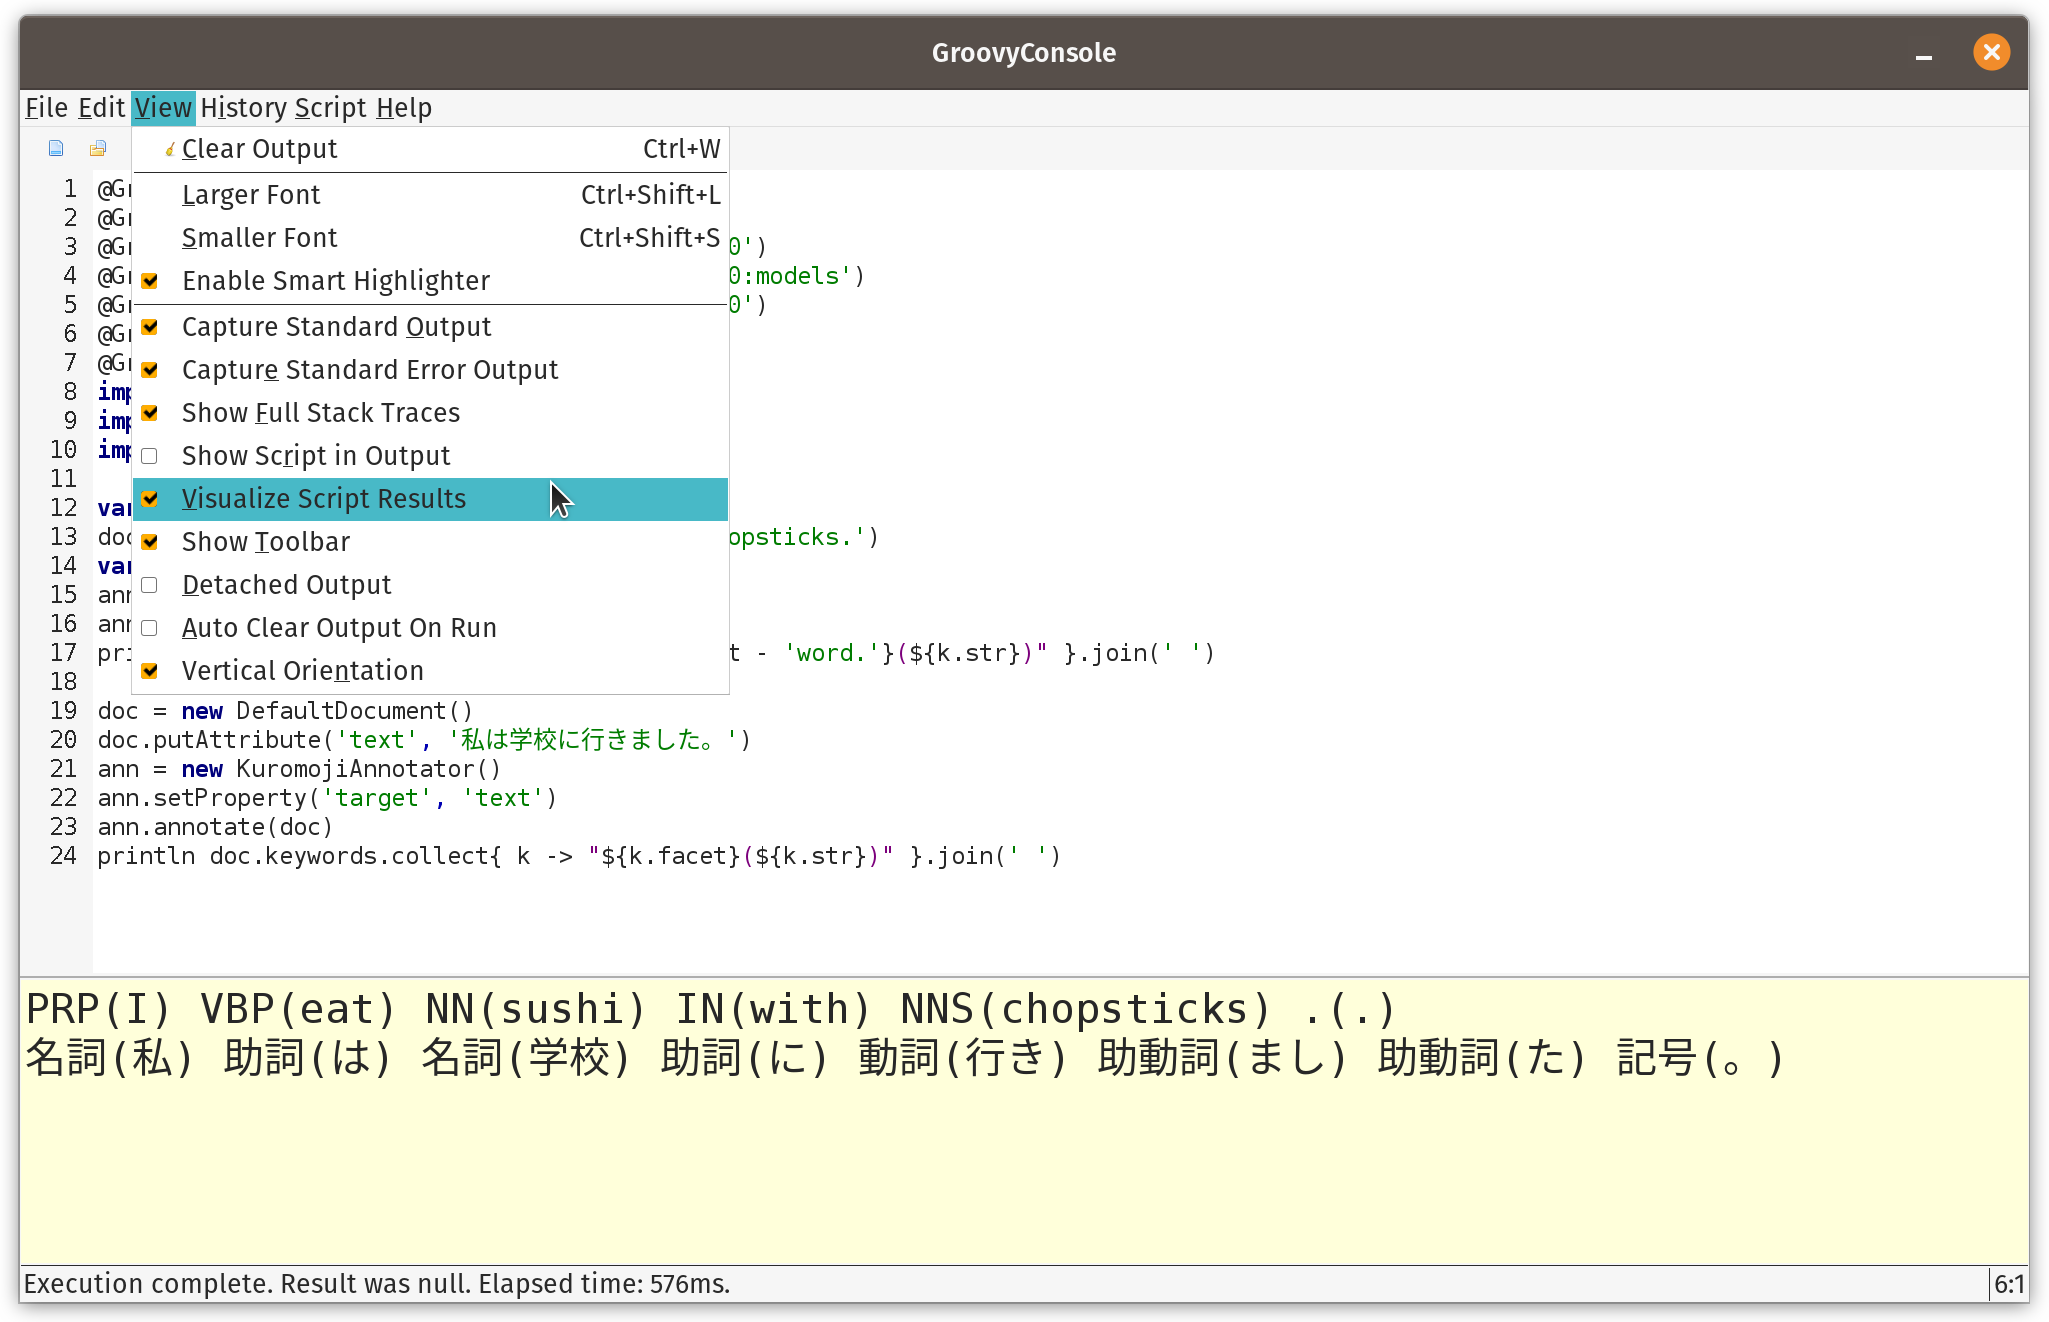
然后运行脚本时,我们应该会看到以下内容
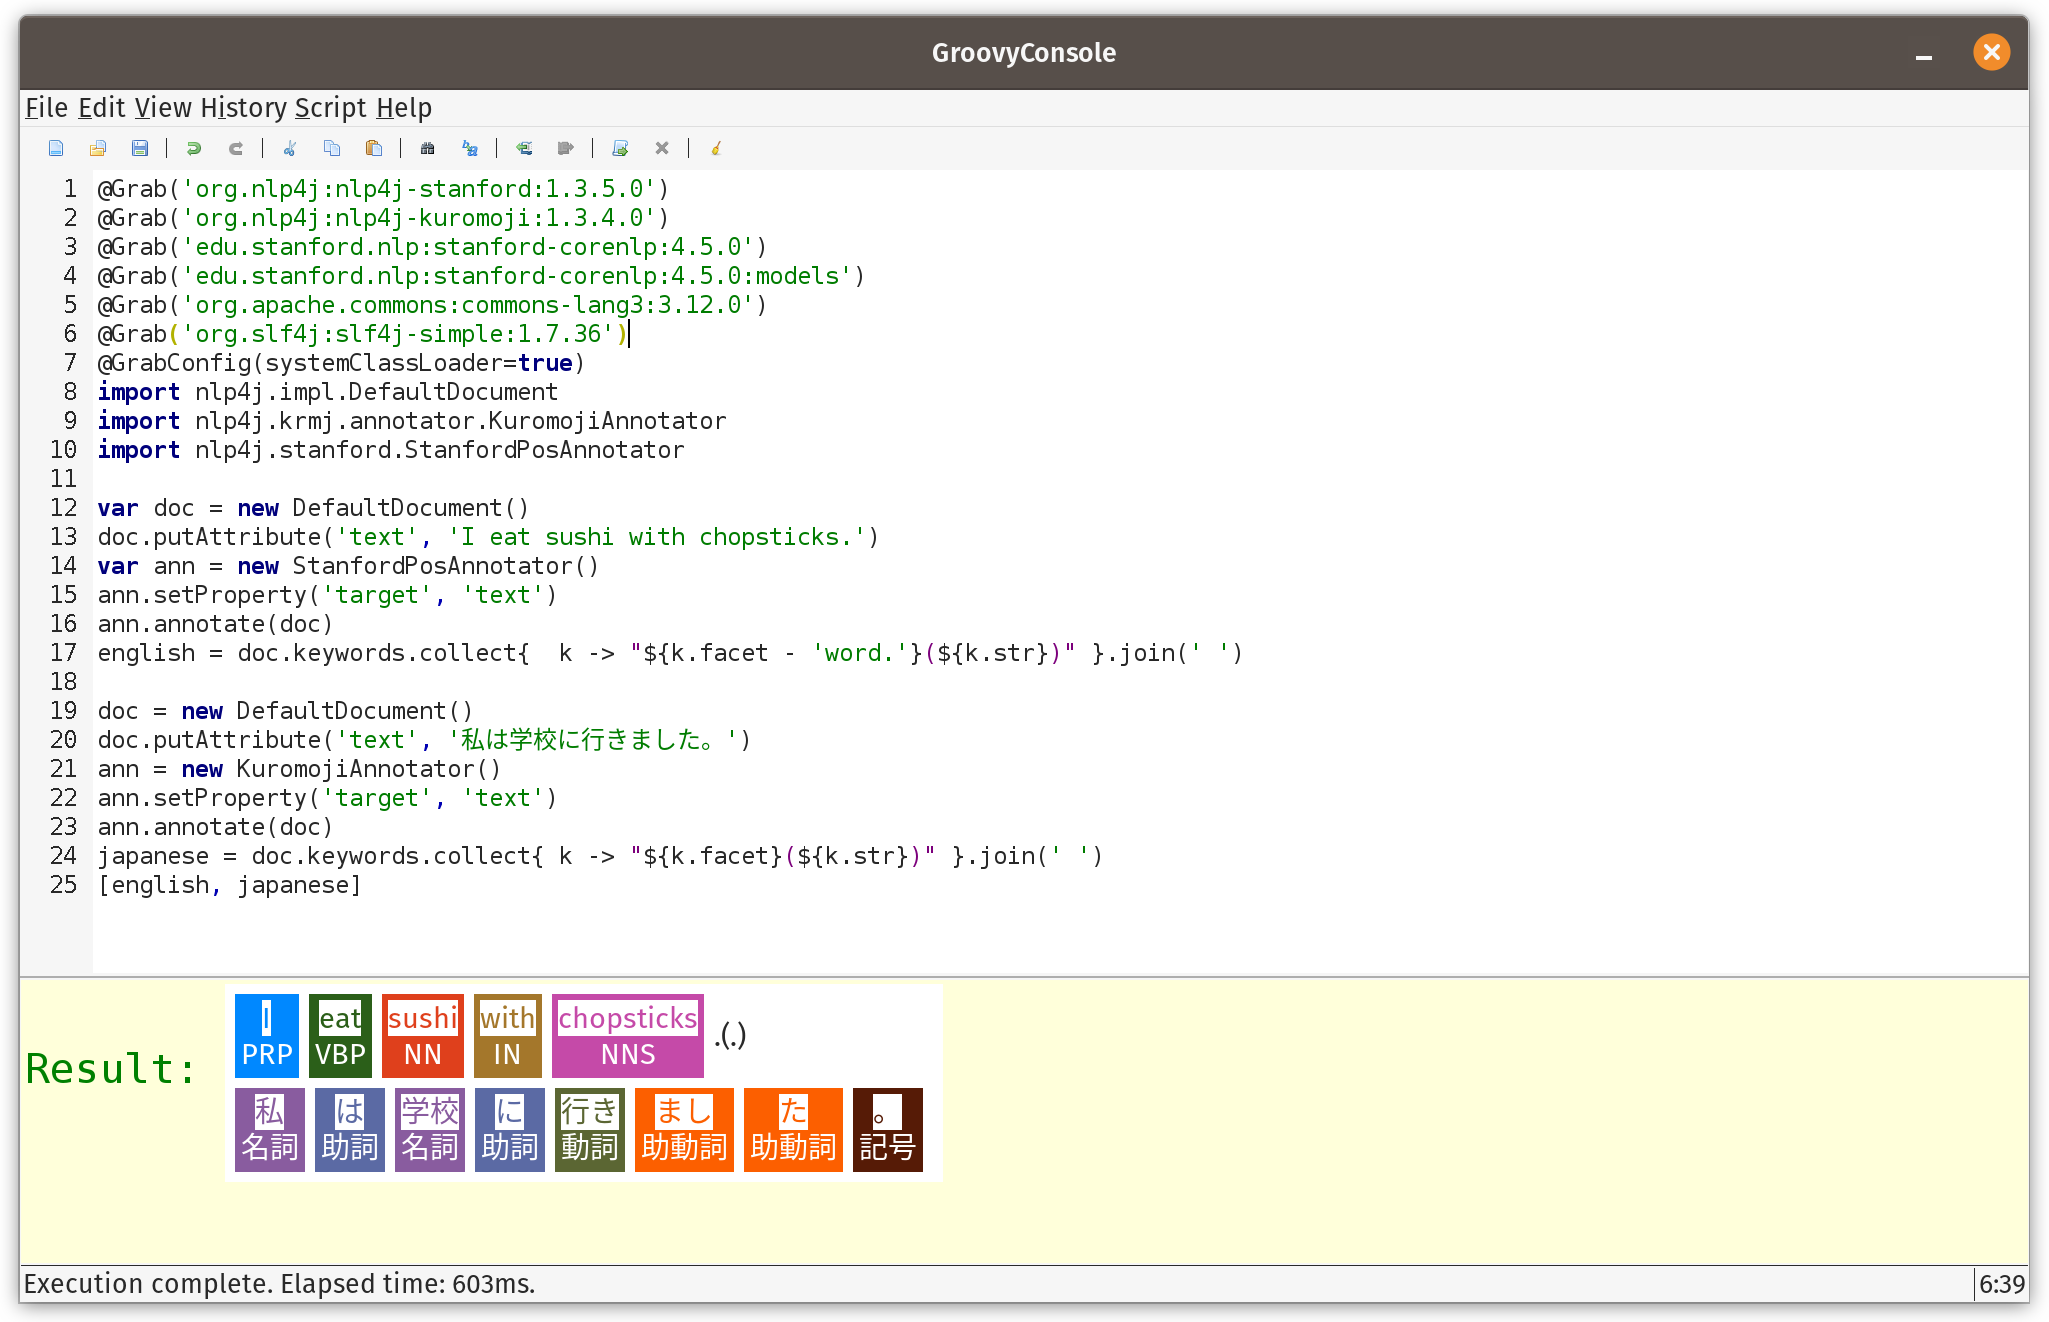
可视化纯粹是可选的,但增添了不错的触感。如果在 Jupyter/BeakerX 等笔记本环境中使用 Groovy,这些环境可能也有可视化工具。
让我们看看使用 Smile 库的一个更大例子。
首先,我们将要检查的句子
def sentences = [
    'Paul has two sisters, Maree and Christine.',
    'No wise fish would go anywhere without a porpoise',
    'His bark was much worse than his bite',
    'Turn on the lights to the main bedroom',
    "Light 'em all up",
    'Make it dark downstairs'
]
其中有几句话可能看起来有点奇怪,但它们被选中是为了展示许多不同的 POS 标签。
Smile 有一个分词器类,可以将句子分成单词。它处理许多情况,例如缩写和缩写词(“e.g.”、“’tis”、“won’t”)。Smile 还有一个基于隐马尔可夫模型的 POS 类,并为该类使用了内置模型。这是我们使用这些类的代码
def tokenizer = new SimpleTokenizer(true)
sentences.each {
    def tokens = Arrays.stream(tokenizer.split(it)).toArray(String[]::new)
    def tags = HMMPOSTagger.default.tag(tokens)*.toString()
    println tokens.indices.collect{tags[it] == tokens[it] ? tags[it] : "${tags[it]}(${tokens[it]})" }.join(' ')
}
我们对每个句子运行分词器。然后,每个标记直接显示或带有其标签(如果存在)。
运行脚本会得到这个可视化
|
[注意:仓库中的脚本只打印到标准输出,这在使用命令行或 IDE 时非常完美。GoovyConsole 中的可视化只针对实际结果。因此,如果您在家中跟着操作并希望使用 GroovyConsole,您需要将 each 更改为 collect 并删除 println,这样应该可以进行可视化了。]
OpenNLP 代码非常相似
def tokenizer = SimpleTokenizer.INSTANCE
sentences.each {
    String[] tokens = tokenizer.tokenize(it)
    def posTagger = new POSTaggerME('en')
    String[] tags = posTagger.tag(tokens)
    println tokens.indices.collect{tags[it] == tokens[it] ? tags[it] : "${tags[it]}(${tokens[it]})" }.join(' ')
}
OpenNLP 允许您提供自己的 POS 模型,如果未指定,则会下载一个默认模型。
当脚本运行时,它会显示此可视化效果
|
细心的读者可能已经注意到该库中使用的标签存在一些细微差异。它们本质上是相同的,但使用了略有不同的名称。在 POS 库或模型之间切换时,这是需要注意的一点。请务必查阅您正在使用的库/模型的文档,以了解可用的标签类型。
实体检测
命名实体识别 (NER) 旨在识别和分类文本中的命名实体。感兴趣的类别可能是人、组织、地点、日期等。它是 NLP 许多领域中使用的另一种技术。
我们首先分析我们的句子
String[] sentences = [
    "A commit by Daniel Sun on December 6, 2020 improved Groovy 4's language integrated query.",
    "A commit by Daniel on Sun., December 6, 2020 improved Groovy 4's language integrated query.",
    'The Groovy in Action book by Dierk Koenig et. al. is a bargain at $50, or indeed any price.',
    'The conference wrapped up yesterday at 5:30 p.m. in Copenhagen, Denmark.',
    'I saw Ms. May Smith waving to June Jones.',
    'The parcel was passed from May to June.',
    'The Mona Lisa by Leonardo da Vinci has been on display in the Louvre, Paris since 1797.'
]
我们将使用一些众所周知的模型,我们将重点关注*人*、*钱*、*日期*、*时间*和*地点*模型
def base = 'http://opennlp.sourceforge.net/models-1.5'
def modelNames = ['person', 'money', 'date', 'time', 'location']
def finders = modelNames.collect { model ->
    new NameFinderME(DownloadUtil.downloadModel(new URL("$base/en-ner-${model}.bin"), TokenNameFinderModel))
}
现在我们将对句子进行分词
def tokenizer = SimpleTokenizer.INSTANCE
sentences.each { sentence ->
    String[] tokens = tokenizer.tokenize(sentence)
    Span[] tokenSpans = tokenizer.tokenizePos(sentence)
    def entityText = [:]
    def entityPos = [:]
    finders.indices.each {fi ->
        // could be made smarter by looking at probabilities and overlapping spans
        Span[] spans = finders[fi].find(tokens)
        spans.each{span ->
            def se = span.start..<span.end
            def pos = (tokenSpans[se.from].start)..<(tokenSpans[se.to].end)
            entityPos[span.start] = pos
            entityText[span.start] = "$span.type(${sentence[pos]})"
        }
    }
    entityPos.keySet().sort().reverseEach {
        def pos = entityPos[it]
        def (from, to) = [pos.from, pos.to + 1]
        sentence = sentence[0..<from] + entityText[it] + sentence[to..-1]
    }
    println sentence
}
可视化后,显示如下
|
我们可以在这里看到,大多数示例都按照我们预期的方式进行了分类。我们需要改进我们的模型,才能在“五月到六月”这个示例上做得更好。
实体检测的扩展
我们还可以在像 Spark NLP 这样的平台上运行我们的命名实体检测算法,该平台为 Apache Spark 添加了 NLP 功能。我们将使用 glove_100d 嵌入和 onto_100 NER 模型。
var assembler = new DocumentAssembler(inputCol: 'text', outputCol: 'document', cleanupMode: 'disabled')

var tokenizer = new Tokenizer(inputCols: ['document'] as String[], outputCol: 'token')

var embeddings = WordEmbeddingsModel.pretrained('glove_100d').tap {
    inputCols = ['document', 'token'] as String[]
    outputCol = 'embeddings'
}

var model = NerDLModel.pretrained('onto_100', 'en').tap {
    inputCols = ['document', 'token', 'embeddings'] as String[]
    outputCol ='ner'
}

var converter = new NerConverter(inputCols: ['document', 'token', 'ner'] as String[], outputCol: 'ner_chunk')

var pipeline = new Pipeline(stages: [assembler, tokenizer, embeddings, model, converter] as PipelineStage[])

var spark = SparkNLP.start(false, false, '16G', '', '', '')

var text = [
    "The Mona Lisa is a 16th century oil painting created by Leonardo. It's held at the Louvre in Paris."
]
var data = spark.createDataset(text, Encoders.STRING()).toDF('text')

var pipelineModel = pipeline.fit(data)

var transformed = pipelineModel.transform(data)
transformed.show()

use(SparkCategory) {
    transformed.collectAsList().each { row ->
        def res =  row.text
        def chunks = row.ner_chunk.reverseIterator()
        while (chunks.hasNext()) {
            def chunk = chunks.next()
            int begin = chunk.begin
            int end = chunk.end
            def entity = chunk.metadata.get('entity').get()
            res = res[0..<begin] + "$entity($chunk.result)" + res[end<..-1]
        }
        println res
    }
}
我们不会在此处详细介绍所有细节。总之,代码设置了一个管道,通过一系列步骤,将我们的输入句子转换为块,其中每个块对应一个检测到的实体。每个块都有一个开始和结束位置,以及一个相关的标签类型。
这可能看起来与我们之前的例子没有太大区别,但如果我们的数据量很大,并且我们在一个大型集群中运行,这项工作就可以分散到集群中的工作节点上。
这里我们使用了一个实用程序 SparkCategory 类,它使得以 Groovy 简写语法访问 Spark Row 实例中的信息更加方便。我们可以使用 row.text 而不是 row.get(row.fieldIndex('text'))。以下是此实用程序类的代码
class SparkCategory {
    static get(Row r, String field) { r.get(r.fieldIndex(field)) }
}
如果要做比这个简单示例更复杂的事情,可以通过各种标准 Groovy 技术使 SparkCategory 的使用变得隐式。
当我们运行脚本时,我们看到以下输出
22/08/07 12:31:39 INFO SparkContext: Running Spark version 3.3.0
...
glove_100d download started this may take some time.
Approximate size to download 145.3 MB
...
onto_100 download started this may take some time.
Approximate size to download 13.5 MB
...
+--------------------+--------------------+--------------------+--------------------+--------------------+--------------------+
|                text|            document|               token|          embeddings|                 ner|           ner_chunk|
+--------------------+--------------------+--------------------+--------------------+--------------------+--------------------+
|The Mona Lisa is ...|[{document, 0, 98...|[{token, 0, 2, Th...|[{word_embeddings...|[{named_entity, 0...|[{chunk, 0, 12, T...|
+--------------------+--------------------+--------------------+--------------------+--------------------+--------------------+
PERSON(The Mona Lisa) is a DATE(16th century) oil painting created by PERSON(Leonardo). It's held at the FAC(Louvre) in GPE(Paris).
结果显示如下可视化
|
这里 FAC 指的是设施(建筑物、机场、高速公路、桥梁等),GPE 指的是地缘政治实体(国家、城市、州等)。
句子检测
文本中的句子检测起初可能看起来是一个简单的概念,但存在许多特殊情况。
考虑以下文本
def text = '''
The most referenced scientific paper of all time is "Protein measurement with the
Folin phenol reagent" by Lowry, O. H., Rosebrough, N. J., Farr, A. L. & Randall,
R. J. and was published in the J. BioChem. in 1951. It describes a method for
measuring the amount of protein (even as small as 0.2 γ, were γ is the specific
weight) in solutions and has been cited over 300,000 times and can be found here:
https://www.jbc.org/content/193/1/265.full.pdf. Dr. Lowry completed
two doctoral degrees under an M.D.-Ph.D. program from the University of Chicago
before moving to Harvard under A. Baird Hastings. He was also the H.O.D of
Pharmacology at Washington University in St. Louis for 29 years.
'''
每个句子末尾都有句号(尽管通常也可以是其他标点符号,如感叹号和问号)。缩写、URL、小数等也有句号和小数点。句子检测算法可能有一些特殊硬编码的情况,如“Dr.”、“Ms.”或表情符号,也可能使用一些启发式方法。通常,它们也可能通过上述示例进行训练。
以下是一些用于 OpenNLP 检测上述句子中的句子的代码
def helper = new ResourceHelper('http://opennlp.sourceforge.net/models-1.5')
def model = new SentenceModel(helper.load('en-sent'))
def detector = new SentenceDetectorME(model)
def sentences = detector.sentDetect(text)
assert text.count('.') == 28
assert sentences.size() == 4
println "Found ${sentences.size()} sentences:\n" + sentences.join('\n\n')
它有以下输出
Downloading en-sent
Found 4 sentences:
The most referenced scientific paper of all time is "Protein measurement with the
Folin phenol reagent" by Lowry, O. H., Rosebrough, N. J., Farr, A. L. & Randall,
R. J. and was published in the J. BioChem. in 1951.

It describes a method for
measuring the amount of protein (even as small as 0.2 γ, were γ is the specific
weight) in solutions and has been cited over 300,000 times and can be found here:
https://www.jbc.org/content/193/1/265.full.pdf.

Dr. Lowry completed
two doctoral degrees under an M.D.-Ph.D. program from the University of Chicago
before moving to Harvard under A. Baird Hastings.

He was also the H.O.D of
Pharmacology at Washington University in St. Louis for 29 years.
我们可以看到,它处理了示例中的所有棘手情况。
使用三元组进行关系抽取
在检测命名实体和某些词的各种词性之后,下一步是探索它们之间的关系。这通常以**主语-谓语-宾语**三元组的形式完成。在我们之前的 NER 示例中,对于句子“大会于昨天下午 5:30 在丹麦哥本哈根结束。”,我们找到了各种日期、时间和地点命名实体。
我们可以使用 MinIE 库(反过来使用 Standford CoreNLP 库)通过以下代码提取三元组
def parser = CoreNLPUtils.StanfordDepNNParser()
sentences.each { sentence ->
    def minie = new MinIE(sentence, parser, MinIE.Mode.SAFE)

    println "\nInput sentence: $sentence"
    println '============================='
    println 'Extractions:'
    for (ap in minie.propositions) {
        println "\tTriple: $ap.tripleAsString"
        def attr = ap.attribution.attributionPhrase ? ap.attribution.toStringCompact() : 'NONE'
        println "\tFactuality: $ap.factualityAsString\tAttribution: $attr"
        println '\t----------'
    }
}
上述句子的输出如下所示
Input sentence: The conference wrapped up yesterday at 5:30 p.m. in Copenhagen, Denmark.
=============================
Extractions:
        Triple: "conference"    "wrapped up yesterday at"       "5:30 p.m."
        Factuality: (+,CT)      Attribution: NONE
        ----------
        Triple: "conference"    "wrapped up yesterday in"       "Copenhagen"
        Factuality: (+,CT)      Attribution: NONE
        ----------
        Triple: "conference"    "wrapped up"    "yesterday"
        Factuality: (+,CT)      Attribution: NONE
我们现在可以将之前检测到的实体之间的关系拼凑起来。
在之前的 NER 示例中,也存在一个问题案例:“包裹从五月传到六月。”。使用之前的模型,将“五月到六月”检测为日期。让我们直接使用 CoreNLP 的三元组提取来探索这一点。我们在此处不显示源代码,但 CoreNLP 支持 简单 和 更强大 的方法来解决此问题。使用更强大技术处理问题句子的输出是
Sentence #7: The parcel was passed from May to June.
root(ROOT-0, passed-4)
det(parcel-2, The-1)
nsubj:pass(passed-4, parcel-2)
aux:pass(passed-4, was-3)
case(May-6, from-5)
obl:from(passed-4, May-6)
case(June-8, to-7)
obl:to(passed-4, June-8)
punct(passed-4, .-9)

Triples:
1.0 parcel was passed
1.0 parcel was passed to June
1.0 parcel was passed from May to June
1.0 parcel was passed from May
我们可以看到,这在将我们拥有的实体及其关系拼凑在一起方面做得更好。
情感分析
情感分析是一种用于确定数据是积极、消极还是中性的 NLP 技术。Standford CoreNLP 有用于此目的的默认模型
def doc = new Document('''
StanfordNLP is fantastic!
Groovy is great fun!
Math can be hard!
''')
for (sent in doc.sentences()) {
    println "${sent.toString().padRight(40)} ${sent.sentiment()}"
}
其输出如下
[main] INFO edu.stanford.nlp.parser.common.ParserGrammar - Loading parser from serialized file edu/stanford/nlp/models/lexparser/englishPCFG.ser.gz ... done [0.6 sec].
[main] INFO edu.stanford.nlp.sentiment.SentimentModel - Loading sentiment model edu/stanford/nlp/models/sentiment/sentiment.ser.gz ... done [0.1 sec].
StanfordNLP is fantastic!                POSITIVE
Groovy is great fun!                     VERY_POSITIVE
Math can be hard!                        NEUTRAL
我们也可以训练自己的模型。让我们从两个数据集开始
def datasets = [
    positive: getClass().classLoader.getResource("rt-polarity.pos").toURI(),
    negative: getClass().classLoader.getResource("rt-polarity.neg").toURI()
]
我们首先使用 Datumbox,正如我们之前看到的,它需要我们算法的训练参数
def trainingParams = new TextClassifier.TrainingParameters(
    numericalScalerTrainingParameters: null,
    featureSelectorTrainingParametersList: [new ChisquareSelect.TrainingParameters()],
    textExtractorParameters: new NgramsExtractor.Parameters(),
    modelerTrainingParameters: new MultinomialNaiveBayes.TrainingParameters()
)
现在我们创建算法,用训练数据集对其进行训练,并出于说明目的根据训练数据集进行验证
def config = Configuration.configuration
TextClassifier classifier = MLBuilder.create(trainingParams, config)
classifier.fit(datasets)
def metrics = classifier.validate(datasets)
println "Classifier Accuracy (using training data): $metrics.accuracy"
输出显示在这里
[main] INFO com.datumbox.framework.core.common.dataobjects.Dataframe$Builder - Dataset Parsing positive class
[main] INFO com.datumbox.framework.core.common.dataobjects.Dataframe$Builder - Dataset Parsing negative class
...
Classifier Accuracy (using training data): 0.8275959103273615
现在我们可以针对几个句子测试我们的模型
['Datumbox is divine!', 'Groovy is great fun!', 'Math can be hard!'].each {
    def r = classifier.predict(it)
    def predicted = r.YPredicted
    def probability = sprintf '%4.2f', r.YPredictedProbabilities.get(predicted)
    println "Classifing: '$it',  Predicted: $predicted,  Probability: $probability"
}
其输出如下
...
[main] INFO com.datumbox.framework.applications.nlp.TextClassifier - predict()
...
Classifing: 'Datumbox is divine!', Predicted: positive, Probability: 0.83
Classifing: 'Groovy is great fun!', Predicted: positive, Probability: 0.80
Classifing: 'Math can be hard!', Predicted: negative, Probability: 0.95
我们可以用 OpenNLP 做同样的事情。首先,我们收集输入数据。OpenNLP 期望它在一个带有标记示例的单一数据集中
def trainingCollection = datasets.collect { k, v ->
    new File(v).readLines().collect{"$k $it".toString() }
}.sum()
现在,我们将训练两个模型。一个使用**朴素贝叶斯**,另一个使用**最大熵**。我们训练了这两个变体。
def variants = [
        Maxent    : new TrainingParameters(),
        NaiveBayes: new TrainingParameters((CUTOFF_PARAM): '0', (ALGORITHM_PARAM): NAIVE_BAYES_VALUE)
]
def models = [:]
variants.each{ key, trainingParams ->
    def trainingStream = new CollectionObjectStream(trainingCollection)
    def sampleStream = new DocumentSampleStream(trainingStream)
    println "\nTraining using $key"
    models[key] = DocumentCategorizerME.train('en', sampleStream, trainingParams, new DoccatFactory())
}
现在我们使用这两种变体对我们的示例句子进行情感预测
def w = sentences*.size().max()

variants.each { key, params ->
    def categorizer = new DocumentCategorizerME(models[key])
    println "\nAnalyzing using $key"
    sentences.each {
        def result = categorizer.categorize(it.split('[ !]'))
        def category = categorizer.getBestCategory(result)
        def prob = sprintf '%4.2f', result[categorizer.getIndex(category)]
        println "${it.padRight(w)} $category ($prob)"
    }
}
当我们运行这个时,我们得到
Training using Maxent …done.
…

Training using NaiveBayes …done.
…

Analyzing using Maxent
OpenNLP is fantastic! positive (0.64)
Groovy is great fun! positive (0.74)
Math can be hard! negative (0.61)

Analyzing using NaiveBayes
OpenNLP is fantastic! positive (0.72)
Groovy is great fun! positive (0.81)
Math can be hard! negative (0.72)
与我们为 Datumbox 训练的模型相比,这里的模型概率水平似乎较低。如果这是一个问题,我们可以尝试进一步调整训练参数。我们可能还需要一个更大的测试集来让自己相信每个模型的相对优点。一些模型在小型数据集上可能会过度训练,并且在与训练数据集相似的数据上表现非常好,但在其他数据上表现差得多。
这个例子灵感来源于 DJL 示例模块 中的 UniversalSentenceEncoder 例子。它通过 DeepJavaLibrary (DJL) API 来使用 TensorFlow Hub 中的通用句子编码器模型。
首先我们定义一个转换器。Translator 接口允许我们指定预处理和后处理功能。
class MyTranslator implements NoBatchifyTranslator<String[], double[][]> {
    @Override
    NDList processInput(TranslatorContext ctx, String[] raw) {
        var factory = ctx.NDManager
        var inputs = new NDList(raw.collect(factory::create))
        new NDList(NDArrays.stack(inputs))
    }

    @Override
    double[][] processOutput(TranslatorContext ctx, NDList list) {
        long numOutputs = list.singletonOrThrow().shape.get(0)
        NDList result = []
        for (i in 0..<numOutputs) {
            result << list.singletonOrThrow().get(i)
        }
        result*.toFloatArray() as double[][]
    }
}
在这里,我们手动将输入句子打包到所需的 n 维数据类型中,并将输出计算提取到二维双精度数组中。
接下来,我们通过首先定义预测算法的准则来创建我们的 predict 方法。我们将使用我们的转换器,使用 TensorFlow 引擎,使用 TensorFlow Hub 中预定义的句子编码器模型,并表明我们正在创建一个文本嵌入应用程序
def predict(String[] inputs) {
    String modelUrl = "https://storage.googleapis.com/tfhub-modules/google/universal-sentence-encoder/4.tar.gz"

    Criteria<String[], double[][]> criteria =
        Criteria.builder()
            .optApplication(Application.NLP.TEXT_EMBEDDING)
            .setTypes(String[], double[][])
            .optModelUrls(modelUrl)
            .optTranslator(new MyTranslator())
            .optEngine("TensorFlow")
            .optProgress(new ProgressBar())
            .build()
    try (var model = criteria.loadModel()
         var predictor = model.newPredictor()) {
        predictor.predict(inputs)
    }
}
接下来,让我们定义我们的输入字符串
String[] inputs = [
    "Cycling is low impact and great for cardio",
    "Swimming is low impact and good for fitness",
    "Palates is good for fitness and flexibility",
    "Weights are good for strength and fitness",
    "Orchids can be tricky to grow",
    "Sunflowers are fun to grow",
    "Radishes are easy to grow",
    "The taste of radishes grows on you after a while",
]
var k = inputs.size()
现在,我们将使用预测器方法计算每个句子的嵌入。我们将打印出嵌入,并计算嵌入的点积。点积(在这种情况下与内积相同)揭示了句子之间的相关性。
var embeddings = predict(inputs)

var z = new double[k][k]
for (i in 0..<k) {
    println "Embedding for: ${inputs[i]}\n${embeddings[i]}"
    for (j in 0..<k) {
        z[i][j] = dot(embeddings[i], embeddings[j])
    }
}
最后,我们将使用 Smile 的 Heatmap 类来呈现一个漂亮显示,突出数据揭示的内容
new Heatmap(inputs, inputs, z, Palette.heat(20).reverse()).canvas().with {
    title = 'Semantic textual similarity'
    setAxisLabels('', '')
    window()
}
输出显示了嵌入
Loading:     100% |========================================|
2022-08-07 17:10:43.212697: ... This TensorFlow binary is optimized with oneAPI Deep Neural Network Library (oneDNN) to use the following CPU instructions in performance-critical operations:  AVX2
...
2022-08-07 17:10:52.589396: ... SavedModel load for tags { serve }; Status: success: OK...
...
Embedding for: Cycling is low impact and great for cardio
[-0.02865048497915268, 0.02069241739809513, 0.010843578726053238, -0.04450441896915436, ...]
...
Embedding for: The taste of radishes grows on you after a while
[0.015841705724596977, -0.03129228577017784, 0.01183396577835083, 0.022753292694687843, ...]
嵌入是相似性的指示。两个含义相似的句子通常具有相似的嵌入。
显示的图形如下
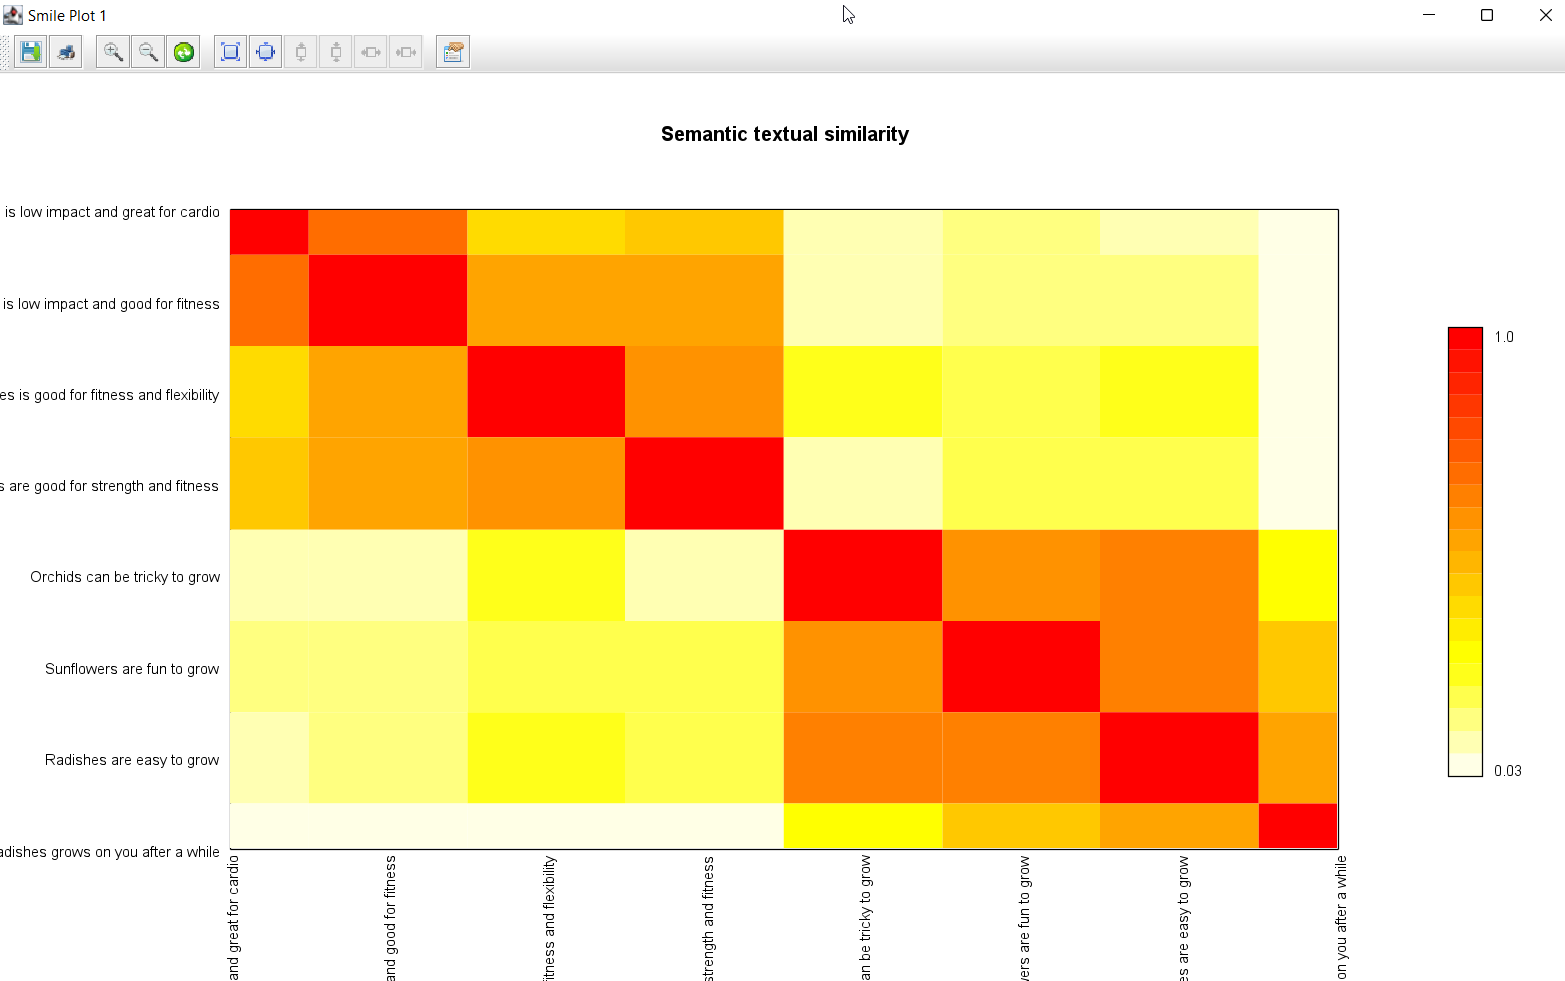
此图表显示,我们的前四个句子有些相关,最后四个句子也是如此,但这两组之间几乎没有关系。
更多信息
更多示例可在相关仓库中找到
结论
我们已经研究了一系列使用各种 NLP 库的 NLP 示例。希望您能看到一些可以在您自己的应用程序中利用更多 NLP 技术的情况。